Airbrushing ghost flames
 do you need to produce ghost flames or other custom paint impacts, but don't know how? Listed here is a quick, simple, and cheap technique. This process cannot need a paint gun, airbrush, as well as color. Follow this step by step treatment watching the video tutorial and you'll be able to perform this towards own vehicle. Best of all, if you do not enjoy it, we'll even explain to you a technique for removing it.
All it will take to achieve this is 1/8 inch good range tape, 3/4 hiding tape, an item of 3000 grit sandpaper, and about 20 mins. That is it!
Step One Clean Paint Finish
Very first you need to pull all soil and contaminates from paint surface. You can clean your whole automobile, or if you're not up to it, just wash and clean the outer lining where in actuality the fire or other design will be positioned.
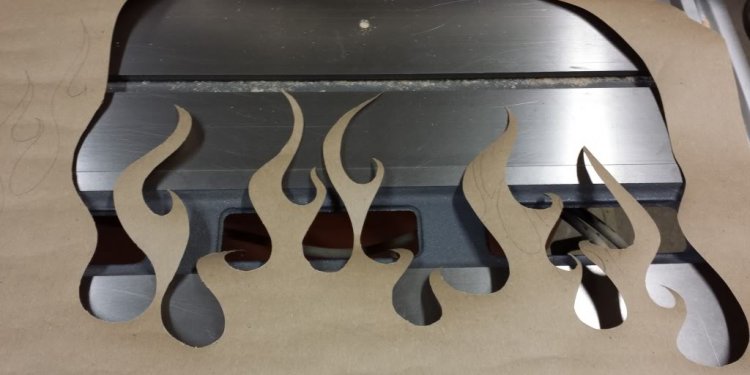
Step Two Outline Design
With the 1/8 inches good line tape, make your design on panel. You can view the way we made a flame within the movie. However, any design is going to work the making use of the exact same technique.
3 Outline The Outline
Making use of the 3/4 inches tape, outline the good line tape. This may provide you with a wider outline after you tend to be completed. Make sure one edge of the 3/4 inches tape laps over the good line, but don't mask totally over your fine range tape, because will mess your design up. Not sure what I am talking about? Just watch the video and it will all make sense.
Step 4 Lightly Sand Design
With the 3000 grit sandpaper lightly sand the look. Take care not to sand through the external tape side. In video, our company is fading the consequence by sanding harder regarding the recommendations and lighter on edges. The middle of the outline was very slightly sanded. However, you can sand the entire design evenly should you desire. This can offer your complete design a matte appearance rather than the faded appearance we did within the video.
Action 5 Unmask the style
Now merely unmask the style therefore're done. It really is that facile.
Details
What if I do not like the picture once it is done?
It may be eliminated. All you have to do is sand the sides of design using the 3000 grit and buff the region with element and polish and it's really gone.
Imagine if i really do not want to make my personal design?
3M tends to make a kit that includes everything you need. You can easily print whatever you wish to their adhesive paper. Then you definitely cut it out and put on desired place of vehicle. This also gets rid of the need for masking. It's called the Custom Image system.
How can I replicate the style if it is both for sides associated with vehicle?
This is really quite straightforward as really. Make use of some hiding report or even gift-wrap paper (that which we utilized in the movie). Place it within the design before you decide to unmask and make use of the medial side of a lead pen to outline the look for your needs. You can then cut the design out and employ it for a template when it comes to other side.
Will this harm my paint?
No, It just sands a tiny portion of the obvious. Indeed, most stores try this to vehicles they just painted. They sand the top to remove any dirt or exorbitant orange-peel, buff and polish.
Share this article
Related Posts

Latest Posts


